Indoor Painting Tips & Techniques
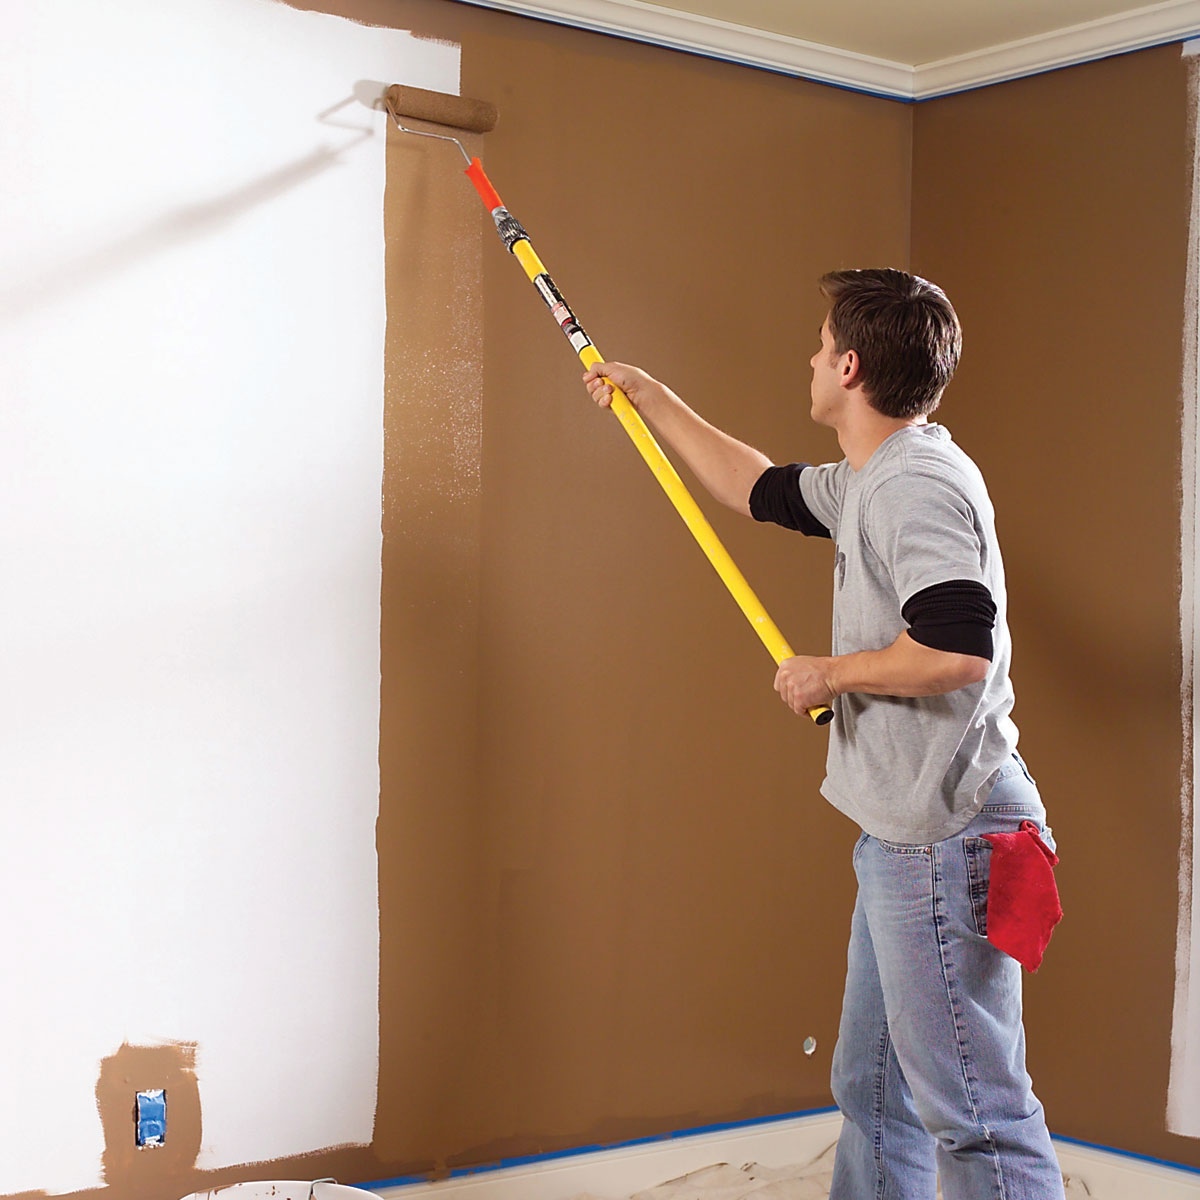
Painting advice: To avoid lap marks, roll the full height of the wall and keep a wet edge
Lap marks are those ugly stripes caused by uneven layers of paint buildup. They occur when you roll over paint that’s already partly dry. (In warm, dry conditions, latex paint can begin to stiffen in less than a minute!) The key to avoiding lap marks when doing DIY wall painting is to maintain a “wet edge,” so each stroke of your roller overlaps the previous stroke before the paint can begin to dry
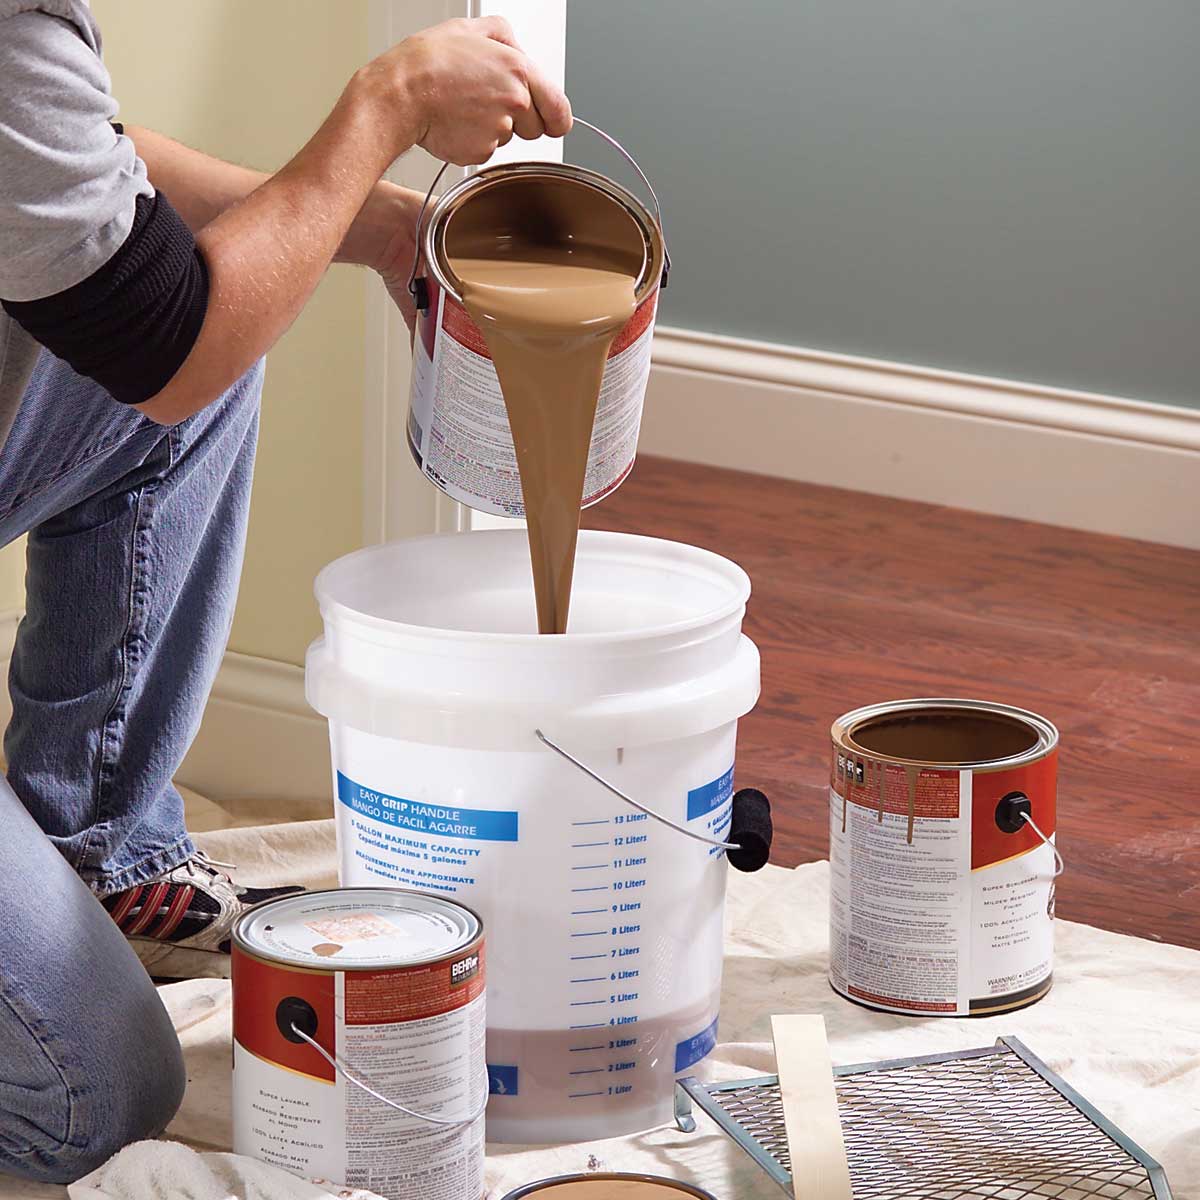
Mix several cans of paint in a large bucket for a consistent color throughout the room
Paint color may vary slightly from one can to the next. If you have to open a new can in the middle of a wall, the difference may be noticeable. Mixing the paints together eliminates the problem. It’s best to estimate the amount of paint you’ll need and mix it in a 5-gallon bucket (a process called “boxing”)
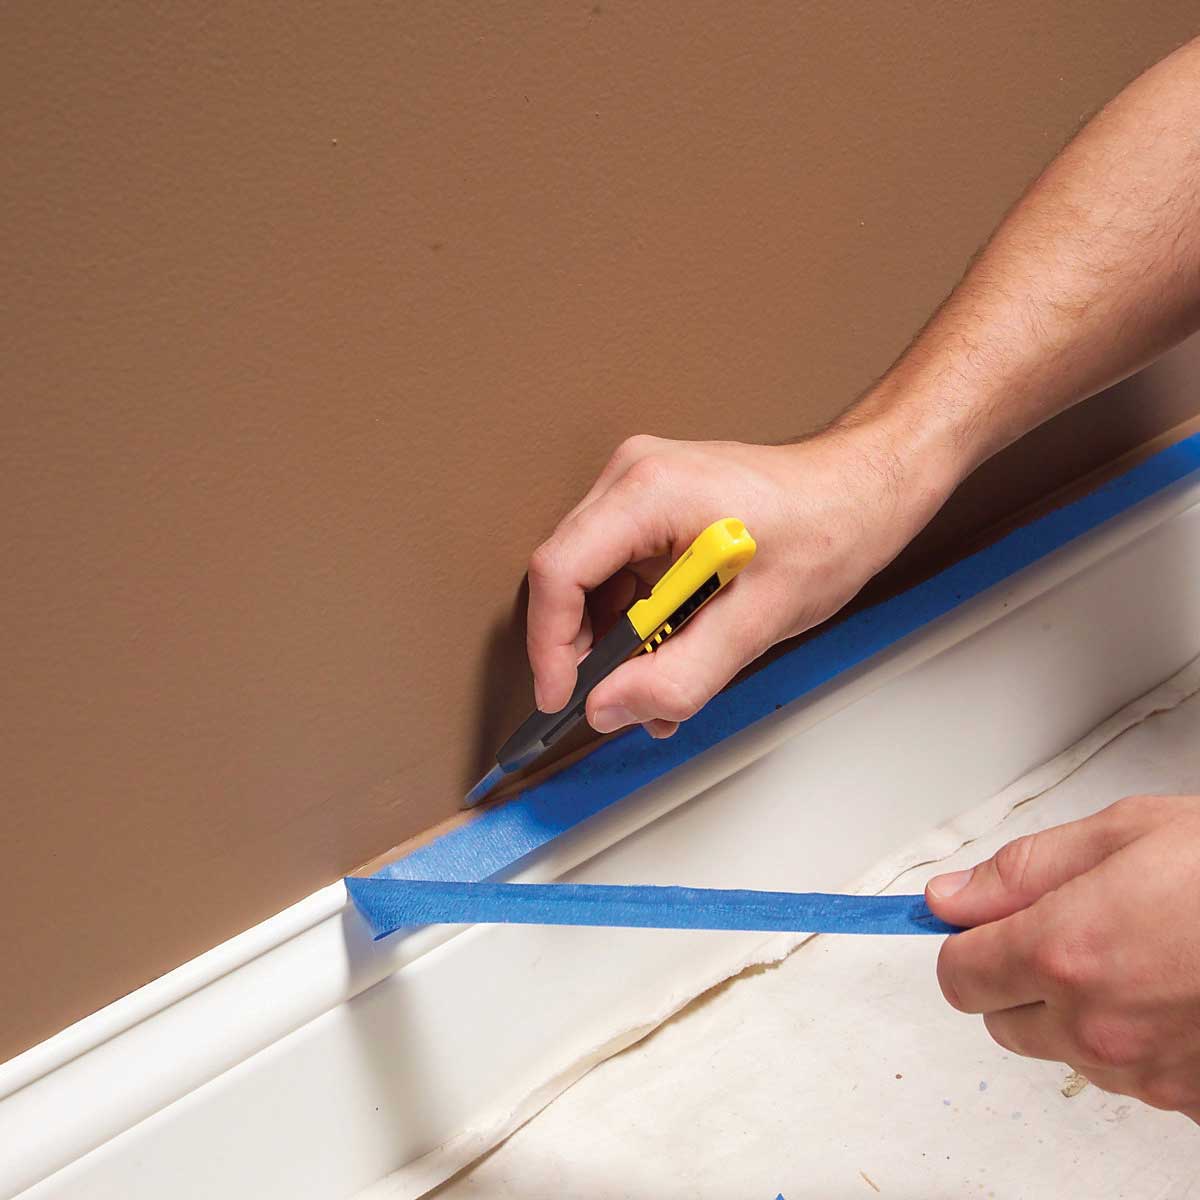
Let the paint dry, then cut the tape loose for a perfect edge
Once paint is dry, you can’t just pull the tape off the trim. Paint forms a film between the wall and the tape, and removing the tape tears pieces of dried paint off the wall. So before pulling off the tape, cut it loose
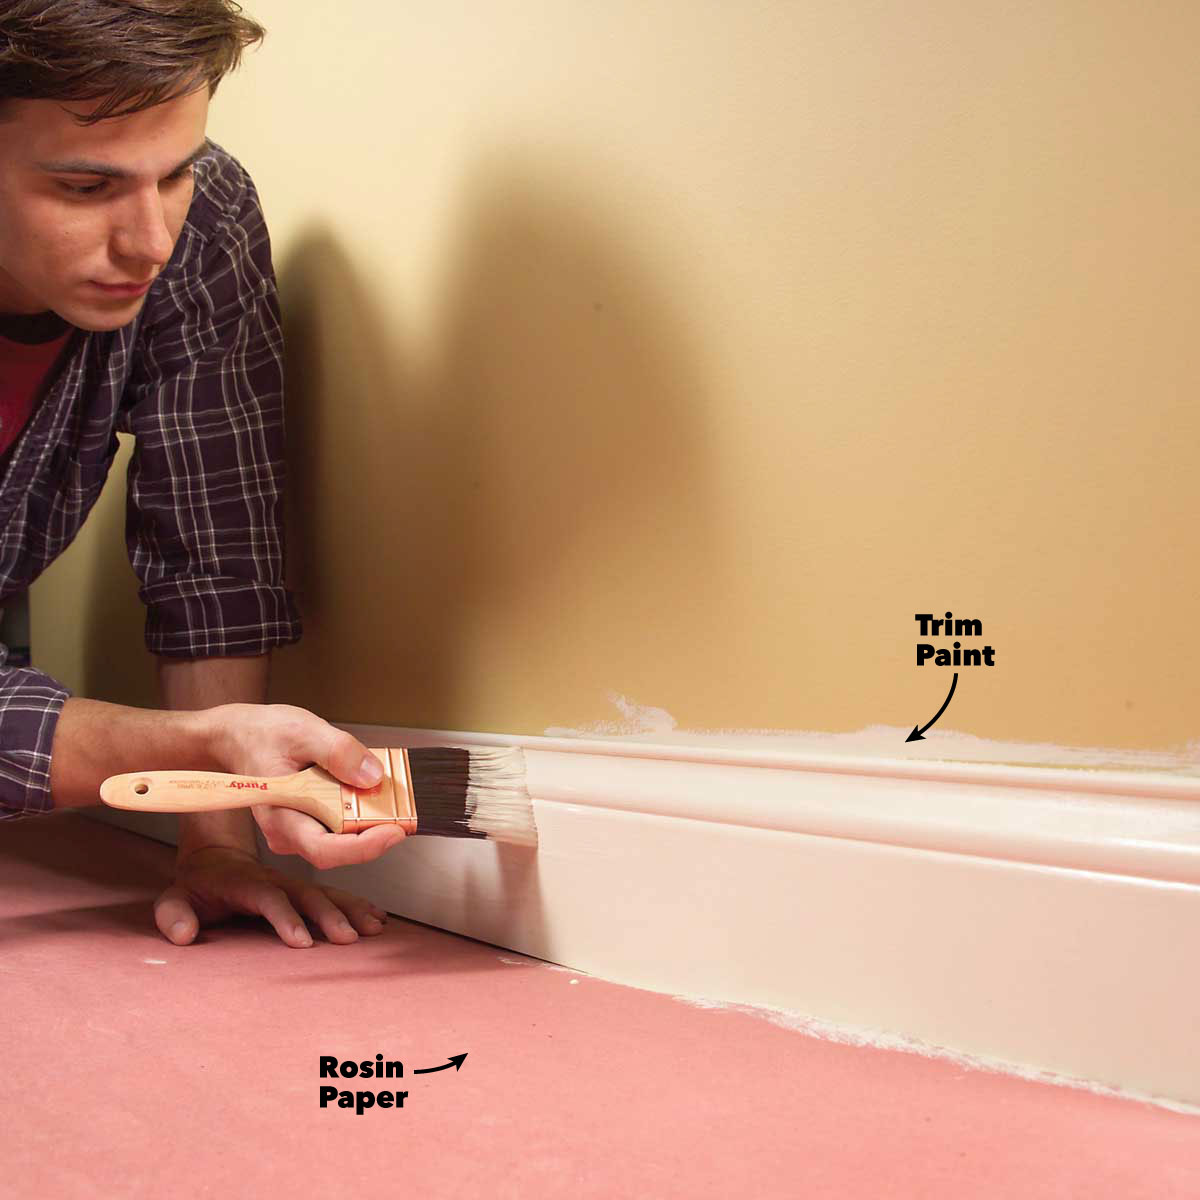
Painting Techniques: Paint the trim first, then the ceiling and walls
Pros usually follow a certain order when painting a room. They paint the trim first, then the ceiling, then the walls. That’s because it’s easier (and faster) to tape off the trim than to tape off the walls. And you certainly don’t want to tape them both off!
Painting Techniques: Prime and texture wall patches to avoid a blotchy finish
Freshly painted walls often look blotchy. The color is uniform, but the sheen isn’t consistent. This usually occurs over the holes and cracks you patched with a filler or drywall compound. The porous fillers absorb the paint, dulling the surface (a problem called “flashing”). When light hits these dull spots, they stick out like a sore thumb. The smooth patch also stands out in contrast to the slightly bumpy texture of the rest of the wall. A quick coat of primer is all it takes to eliminate flashing and texture differences.
Interior Painting Tips
Buy a quart first instead of a large quantity in case you’re not committed to the color. Paint a piece of foam board and move it around the room to see how the light affects the color at different times of the day.
Know the square footage of the room you are painting before you head to the store. The pros recommend one gallon for every 400 square feet. Covering textured, rough or unprimed surfaces may require more
Prep
Paint doesn’t stick very well to dirty walls, so clean them with soap and water (or TSP) and rinse with water once done. Let dry overnight
Painting Ceilings
Scaffolding comes in parts called “bucks” and “cross bucks”. For a high ceiling, four bucks should suffice. Each buck costs about $12 a day to rent. You’ll also need: walk boards or planks to place along the bucks, these rent for about $10 each per day. -Wheels rent separately for scaffolding. They are important because they allow you to move the scaffolding with ease. Four wheels rent for about $25 a day
Time-Saving Options
Use an edger instead of painter’s tape. Buy a good quality edger (they’re fairly inexpensive) and take your time in the corners so that you don’t spend all the extra time taping off everything
Ways to Paint Like a Pro
Wait for dry weather
Humidity means drips and slow drying, so avoid painting on a rainy day. If you must paint when it’s humid, take your time — and take advantage of slow-drying paint to correct your errors before moving on to the next coat. But don’t overwork, or it will show when you’re finished
Do a thorough visual inspection and prep
Any cracked, flaking, or peeling areas need to be lightly sanded or scraped (and then thoroughly rinsed) before applying new primer and paint, because the weight of the new coat will pull the old paint loose. “You’ll just end up wasting your time and money if you don’t tackle that first,” says Tom Lee, Senior VP of Consumer Marketing for Behr. Greasy spots may also need a bit of washing with soap, followed by a rinse with clean water. Otherwise, give the walls a quick wipe-down with a damp cloth so that paint will have a clean, dust-free surface to stick to
Buy high-quality brushes, roller covers, and painter’s tape
If you’re splurging on great paint, you definitely don’t want to pinch pennies on the application. Good brushes and roller covers give excellent coverage so that you don’t waste time and paint on re-application, and high-end painter’s tape is the real deal when it comes to sealing out drips and blurs
Know your nap.
The more texture your walls have, the thicker the nap you’ll want on your roller cover so that it can reach into crevices and give complete coverage. But if you go too thick, you might actually create texture where you don’t want it, so be prepared to give your salesperson details about what you’re painting
Protect anything you don’t want painted.
You will never regret the time you spend covering floors, furniture, and hardware before you begin a paint project. Drop cloths are a must, and small plastic sandwich bags secured with tape are an easy way to protect doorknobs.
Interior Painting Tips for a Flawless Finish
Interior house painting is not intuitive, though it seems like it should be. Beginning in kindergarten with finger-painting, most of us are familiar with the process of applying paint to a flat surface. But a truly professional interior paint job is an entirely different matter. Incorporate these tips into your next interior painting project and make the job go faster and smoother, with a cleaner, more attractive appearance.
Use a Tack Cloth to Clean the Surface
A tack cloth is a very inexpensive painting tool that helps you clean the surface prior to painting or staining for flawless results. A beeswax-impregnated cheesecloth, tack cloth lightly pulls off sawdust, wood shavings, and all manner of debris from your surface. By using a tack cloth, you avoid applying a wet cloth to the surface. If you do not have a tack cloth, you may use a damp cloth, but make sure to squeeze it out thoroughly beforehand. Do not use a tack cloth over large surfaces. It is suited more for trim, doors, and cabinets than for walls and ceilings. Also, avoid pressing hard on the tack cloth as this may smear beeswax on the surface, and this can be difficult to remove.
Purchase High-Quality Roller Covers and Brushes
Cheap, low-quality roller covers leave fuzz and lint on the walls. Once fuzz and lint are embedded in the paint and the paint subsequently dries, you are left with bumpy walls that are difficult to repair. Inferior-quality brushes leave streaky brush marks; instead, purchase high-quality brushes and be meticulous about maintaining your pricey purchase. Some do-it-yourself painters make the mistake of purchasing inexpensive chip brushes. Chip brushes should not be used for interior painting. Rather, they are meant for applying glues, adhesives, and solvents. For both roller covers and brushes, it is worthwhile to pay extra for better tools. In the end, your surface will have a better finish.
Purchase High-Quality Paint
When you see one paint advertised for a price and another, apparently comparable paint for five times as much, what is the difference besides price? Often, rock-bottom cheap paints are builder’s grade paints that have fewer solids than higher quality paints. Solids are what help to create a good paint build. Builder’s grade paints such as Sherwin-Williams ProMar 400 Interior Latex and Valspar Professional Interior Latex do have their place in quick, low-cost, low-commitment paint jobs. But for a paint that will last, purchase a higher-quality paint.
Test for Loose Paint With the Duct Tape Test
Will the existing painted surface take new paint and will it hold this paint for years to come? While it is impossible to predict the future, you can get a good sense of the quality of a surface by testing it with a strip of duct tape. Lay a strip of fresh duct tape over the surface in question, then rip it off. If flakes of paint more than microscopic size come off, you may need to scrape and then sand.
Steps to Professional Interior Painting – Tips and Tricks for A Beautiful Home
Giving your walls and ceiling a fresh coat of paint is one of the quickest ways to improve the appearance of your home… or completely ruin it if you have no idea what you are doing. Cheap brushes, hastily purchased paint, and incorrectly applied painting techniques can all turn what was initially an exciting DIY project into nightmare material. But you don’t have to go down that road. Brew some coffee and check the tips below to paint your home interior like an expert would
Test first (Always)
Don’t be fooled by the color card at your local hardware store. While certainly helpful, it can give you a very misleading idea of how your chosen tint is going to look on your walls.
Take lighting into account
Sunlight or bright LED light bulbs can significantly alter your paint’s appearance and should be taken into account while you’re shopping for supplies. To eliminate any surprises, paint a piece of foam board in your chosen shade and periodically move it around the room. This will help you get a better idea of how your paint will look during the different hours of day and night
Consider the room’s dimensions
Among the most common mistakes when painting – failing to measure the square footage of the room before visiting the store to calculate how much paint you’ll need for your project. For instance, some interior experts will recommend that you purchase a gallon of paint for every 400 square feet.
Box your paint for a consistent color
When you purchase your paint, avoid using it on a bucket-by-bucket basis. Ensure that your Colors will stay consistent throughout the entire project by mixing all the paint you have into one large container